Is your company making use of iPad apps for kiosk-style purposes, or have you ever found yourself in a situation where you needed to lend a device to someone to utilize an app or input data without granting them full access? Apple’s Guided Access accessibility feature is a solution for such scenarios that comes embedded in iOS and iPadOS.
Guided Access empowers a user to secure a single app on the screen, barring users from going back to the Home Screen, launching another app, activating Siri, or using the hardware buttons without inputting a passcode to exit Guided Access.
EXPLORE: What’s included in iOS 18.2?
Configuring Guided Access
To activate Guided Access, adhere to these instructions.
- Launch the Settings application.
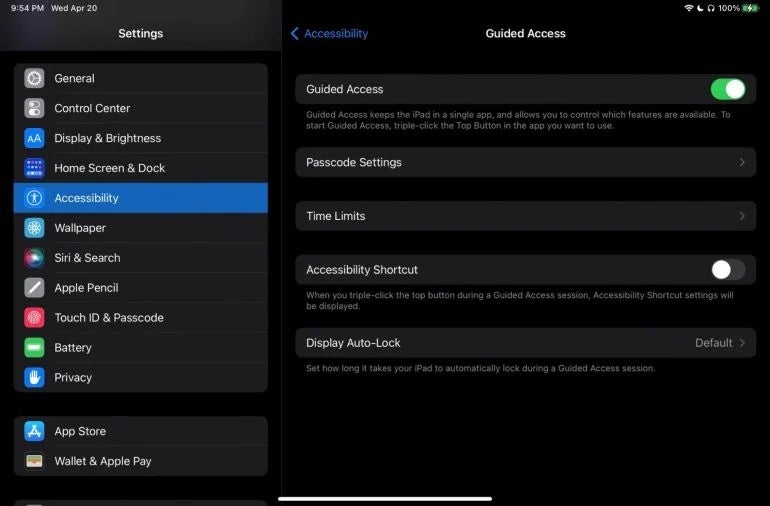
- Go to Accessibility.
- Choose Guided Access.
- Switch on the toggle for Guided Access.
The accessibility shortcut allows you to trigger Guided Access by triple-clicking the hardware button on the iPad. If your device has a Home button, press it three times. For devices with Face ID, press the side or top button three times.
Enabling Guided Access
Prior to activating Guided Access, open the app you wish to lock on the screen, and then follow these steps:
- Triple-press the Home button for devices that have it, or the side / top button on devices with Face ID. The Guided Access setup panel will appear.
- Tap the Options button (located bottom left on the screen) to activate or deactivate the use of top buttons, volume buttons, motion, keyboards, touch or dictionary lookup, or set a time limit for Guided Access.
- Press Start to commence. Once initiated, the iPad will remain locked to the selected app, preventing access to other functionalities.

Disabling Guided Access
When you wish to deactivate Guided Access, follow the ensuing steps.
- Triple-click the same button used for activation three times.
- Input your password or verify using Touch ID or Face ID. This will present the Guided Access setup screen where you initially activated the feature, with the Cancel button now transformed into an End button, allowing you to terminate the accessibility feature entirely by tapping it.
Essential Apple Articles
Tips for restricting apps on my iPad
Suppose you aim to limit apps to specific features for kids or other users. In that case, you have to navigate to a distinct menu from the one where the guided access feature is available.
To enforce parental controls on particular media services, head to Settings > Screen Time > Content & Privacy Restrictions > App Store, Media, Web, & Games.
Securing your iOS app with a code
Some developers offer the option for users to set up passcode protection within their apps. However, Apple offers an alternative method through Screen Time.
Access Settings > Screen Time > App Limits > Add Limit. Choose the app category or specific app to restrict. Proceed by selecting Next. Screen Time will lock the app with a code after a set duration, so opt for the shortest time period (1 minute) or define the time frame. Then, click on Block At End Of Limit.
Understanding how to secure apps on an iPad enables you to prevent unauthorized entry to sensitive apps and maintain command over device usage.
Article updated by Megan Crouse, writer at TechnologyAdvice.